

Finding trading signals is one of the core problems of algorithmic trading, without any good signals your strategy will be useless. This is a very abstract process as you cannot intuitively guess what signals will make your strategy profitable or not, because of that I’m going to explain how you can have at least a visualization of the signals so that you can see if the signals make sense and introduce them in your algorithm.
We’re going to use matplotlib to graph the asset price and add buy/sell signals on the same graph, this way you can see if the signals are generated at the right moment or not: buy low, sell high.
Data preparation
For this tutorial I picked a very simple strategy which is a crossing moving average, the idea is to buy when the “short” moving average, let’s say 5-day is crossing the “long” moving average, let’s say 20-day, and to sell when they cross the other way.
First of all, we need to install matplotlib via the usual pip:
pip install matplotlib
This example requires pandas and matplotlib:
import pandas as pd
import matplotlib.pyplot as plt
I’m using the E-mini future dataset from Quandl, see this article.
Loading data and computing the moving averages is pretty trivial thanks to Pandas:
data = pd.DataFrame.from_csv(path='EMini.csv', sep=',')

# Generate moving averages
data = data.reindex(index=data.index[::-1]) # Reverse for the moving average computation
data['Mavg5'] = data['Settle'].rolling(window=5).mean()
data['Mavg20'] = data['Settle'].rolling(window=20).mean()
Now the actual signal generation part is a bit more tricky:
# Save moving averages for the day before
prev_short_mavg = data['Mavg5'].shift(1)
prev_long_mavg = data['Mavg20'].shift(1)

# Select buying and selling signals: where moving averages cross
buys = data.ix[(data['Mavg5'] <= data['Mavg20']) & (prev_short_mavg >= prev_long_mavg)]
sells = data.ix[(data['Mavg5'] >= data['Mavg20']) & (prev_short_mavg <= prev_long_mavg)]
buys and sells is now containing all dates where we have a signal.
Plotting the signals
The interesting part is the graphing of this, the syntax is simple:
plt.plot(X, Y)
We want to display the E-Mini price and the moving averages is pretty simple, we use data.index because the dates in the DataFrame are in the index:
# The label parameter is useful for the legend
plt.plot(data.index, data['Settle'], label='E-Mini future price')
plt.plot(data.index, data['Mavg5'], label='5-day moving average')
plt.plot(data.index, data['Mavg20'], label='20-day moving average')
But for the signals, we want to put each marker at the specific date, which is in the index, and at the E-Mini price level so that visually it’s not too confusing:
plt.plot(buys.index, data.ix[buys.index]['Settle'], '^', markersize=10, color='g')
plt.plot(sells.index, data.ix[sells.index]['Settle'], 'v', markersize=10, color='r')
data.ix[buys.index][‘Settle’] means we take the ‘Settle’ field in the data DataFrame
plt.ylabel('E-Mini future price')
plt.xlabel('Date')
plt.legend(loc=0)
plt.show()
Here is the final result: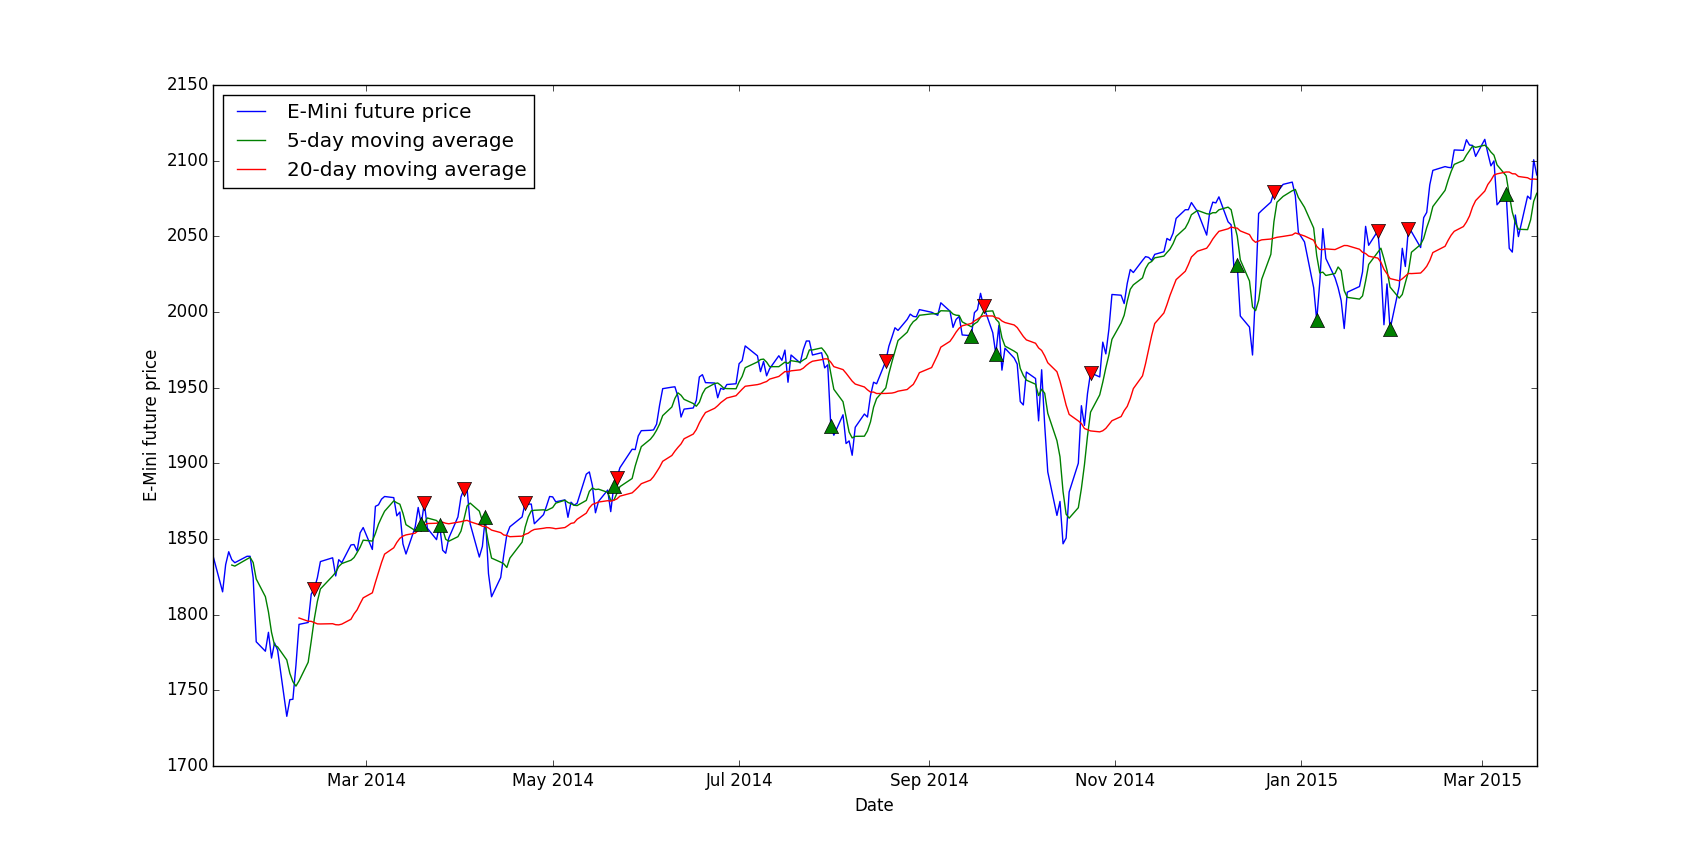
Conclusion
In conclusion, you can interpret this by noticing that most buying signals are at dips in the curve and selling signals are at local maximums. So our signal generation looks promising, however without a real backtest we cannot be sure that the strategy will be profitable, at least we can validate or not a signal.
The main advantage of this method is that we can instantly see if the signals are “right” or not, for example you can play with the short and long moving average, you could try 10-day versus 30-day etc. and in the end you can pick the right parameters for this signal.